Grading with Gills: How Rubrics Help You Catch the Best Work 🎣

Title generated by ChatGPT

crafts table

Rubric-based grading promotes fairness and consistency in the evaluation of student work. You can use a set of clear criteria and ensure that all students are held to the same standards. Additionally, rubrics can be used to provide detailed feedback to students, which can help them understand the strengths and weaknesses of their work and identify areas for improvement. Common rubrics can be a great resource across grade-levels and departments, so students learn the common language and expectations.

If you’re using a digital workflow with students, such as Google Classroom, having common rubrics and using them with students is both easy and effective. Bonus: providing mastery-oriented feedback is also a checkpoint in the UDL Guidelines. You can read more about that here. 

Let’s take a look at how you can use common rubrics AND possibly pair it with a digital workflow.

Template Gallery

Google Workspace provides a template gallery in all the Workspace applications. The Template Gallery allows for common items that may be used repeatedly among your school.  Common rubrics would be a great item to have in your school-wide gallery. When you upload an item to the gallery, it allows your organization to automatically make a copy of it and edit it as their own, in their own Drive. The template does not change your original, you can have the gallery create a copy of the original.  This gallery would be useful for school-wide or district-wide charts, logs, rubrics, slide designs etc.

Finding the Gallery

Are you reading this and asking, where IS this gallery you speak of? Well, the waffle comes in handy on this one.  Long into Google Chrome, go to your waffle, and click the desired app where you would like to store or access a template.

Turn on the Template Gallery

If you don’t see the gallery, visibility of this gallery may need to be turned on in the settings first.

  1. Choose the app where you want to work on templates (if you don’t see them…)
  2. Choose the three lines, click settings
  3. Check the box to display Templates
  4. Click Save


Now you should see an option for the Template Gallery

Click the words Template Gallery for the drop-down and access to your organization’s Templates.

Submit a template for district or organization-wide use.

⭐️The Magic: Using Template Rubrics in Google Classroom ⭐️

Now THIS is where the magic happens!  First, you must use the Google Classroom Rubric Template for this to work! You cannot write in any of the areas that are blank, or the rubric will not upload. Input your indicators, criteria, and then delete out or add any rows you may need. Be sure to including the spacing and formatting that already exists in the template.

Additional Ideas of how to Use Templates:

  • School Wide reading log in Docs – each teacher can take the template and add custom information
  • Prepare a Google Site template for student portfolios! By setting up a skeleton, students will have guidance as to what evidence they would need to provide.
  • Prepare a template survey in Forms that you want all stakeholders to use and send out
  • Digital Student Agenda – create the template to share with all staff, who then can use this master in Google Classroom>every student gets a copy!

In Closing

Google’s Template Gallery is a great resource all on its own, but pair it with common rubrics and mastery-oriented feedback and BOOM 🎆, that’s MAGIC! Not only will we have the benefits of rubric-based grading, but you also add a collaboration and consistency piece when sharing these rubrics in the gallery.

I hope you can grade with gills, and use these new skills to catch some great work!

Take Care, Everyone! 💙

oFISHally Yours,

Erin Fisher 🐟🐟🐟

Perception 🔍👓

big mood

It has taken me some time to put this post into a concise, and thoughtful narrative worthy of your time to read it. Hence, my significant delay in writing it.  It is an area I am very passionate about, not only because of my role as a Technology Integration Facilitator but also in my role as a daughter and a mother.

Recently, I had the privilege of taking a mother-daughter trip to Florida with my 65-year-old mother. She has Kartagener’s syndrome (1:60,000) and as a result, is legally handicapped/disabled. She is on oxygen and requires a wheelchair for longer distances; her lungs simply do not support walking, especially in an already stressful environment. She can access the world as long as she has tools to break down her barrier: her portable oxygen and alternative ways to get around (i.e. wheelchair, people movers, etc). Thankfully, she is protected under the law for these options to be available to her. However, those who do not live in a world of barriers may not plan for all in every environment. It is challenging to foresee a barrier for someone else when you do not experience it yourself.  I found the world we live in today incredibly frustrating to travel for her, to the point where I thought: If this were me, I would shut down and simply not travel. It is the small tasks, that one may not perceive as challenging for oneself, that are challenging for others. For instance, lifting your carry-on into the compartment in the plane or providing someone to push the wheelchair from point A to point B in the airport at all times. The extremely long walk from the car rental location to the airport, where there aren’t wheelchairs available. Even parking! Handicap parking is available, but what happens when you need to take your placard to the vacation destination?! Barriers for my mother are everywhere. This experience translates to learning in a DEEP way, and it struck a chord with me.

If we DO NOT provide options for accessing the curriculum and plan for all, there will be students who WILL shut down.

At its core, technology integration first drew me in due to its nature of inclusivity.  Completed a math lesson today? Throw a video of it on Google Classroom (or your platform of choice) for students to review.  Have an article to read?  Throw it on Google Classroom so students can use a screen reader if they choose, enlarge the text, set the contrast etc.  Have a writing assignment? Use Google Docs so students can type, dictate, or (gasp) use paper if they want! Reviewing for a test? Use a popular game-based site to engage students; Blooket, Kahoot, Quizizz (this is GREAT blog post on that).  Many technologies were designed and implemented to make the world more accessible – whether it’s low tech (ramp, high lighter, pencil grip, calculator, etc) or high tech (Chromebook, amplification system, closed captions, VR, etc).

Perception

Perception is the FIRST level of access to learning. If a student cannot perceive the information given, he/she/they cannot access the curriculum, build upon knowledge and further internalize information.

https://udlguidelines.cast.org/

It is very hard to sit outside of yourself and think of all the barriers that could exist in terms of students simply perceiving the information you are providing. It’s impossible really, to think of everything. So, what do we do?

Start Small

When lesson planning, and creating student activities, ask yourself these three questions:

  1. Can the information I’m providing for students be easily seen? 👁
  2. Can the information I’m providing for students be easily heard? 👂
  3. Can the information I’m providing for students be easily translated? 🗣


Easily Seen eye emoji

Whether information is presented on the board, on paper, or visually, students need to be able to see it in order to access it.  This may seem like a fairly obvious point but, you may not be faced with a visual barrier.  We can make learning more accessible simply by enlarging a font.  Digitally, Control + or Command + on an Apple device will enlarge the screen thus enlarging a font to see.  As a teacher with print material, or information on display, we want to be cognizant of the font we use, the clutter on the page (or board), and the size.  Lexend Font or Open Dyslexic are both great choices for readability.  I love this article from Guy Kawaskaki about the 10/20/30 rule suggesting to use 30 point font, this size is great when presenting to an audience in terms of accessibility.  In the middle-to-upper grades, I am a huge advocate of placing the meat of the lesson in Google Classroom (or the digital platform you use). This allows students to access the information at any time and perceive it as they need. They can alter contrast, enlarge the font, and translate it as needed.  Look around your room, do you think your information posted is easily seen by all students? What is the contrast? The font? The size? The readability?

Easily Heard Bitmoji Image

Making sure students can hear your information may be a little trickier, but it is just as important as your lessons being seen.  As we know, not all of our students’ process information visually. Many, especially our early readers and non-readers, need to hear information as well as see it.  My own son, Chace, benefits from hearing information when he is reading it – he is an auditory processor! Often, I still hear him reading aloud in his room because that is what works best for him, even at 11 years old.  The easiest way to have your lessons easily heard is to read or summarize aloud to students or have students read aloud.  Having students partner read together, whisper phones, videos, are great lower-tech options for auditory information.

Video is also a great option – and you can turn on closed captions to have the video read as well. Screencastify is a great option to record lessons and you can enable closed captions. Did you know you can even slow down the rate of video on YouTube?   Screen readers are a great higher-tech option, with my favorite being Read and Write among many.  Amplification systems, like the Front Row Juno Speaker, are great for cutting out background noise so your students can best hear you. YOU may think you are loud enough, but for that student who has a barrier with background noise, amplification can really assist in perception.  Look at your lessons, can students hear the information easily?

Easily Translated Bitmoji Image

Last but not least, possibly the most challenging, can your information and/or lessons be easily translated? Luckily, there are many tools we can use low-tech or high-tech to assist.  In a previous blog post, I cover digital translation tools you can use such as Google Translate. Images and Emojis are also great options to use with our EL population as it is a common language for all our students.  Video offers excellent options for translation, as you can have the closed captions translated in live time on both YouTube and Google Meet.  What we want to avoid, which is not always easily translated, are PDFs.  Some PDFs can translate easily whereas others do not – it all depends on the source they came from! I always try to dissuade PDFs and encourage Googe Docs. Google Docs is the easy app in the suite that translates.

The End Goal Bitmoji Image

As educators, our end goal is to create expert learners. By making our lessons, activities, and assessments accessible we are increasing our students’ abilities to perceive information, build upon that knowledge, and further internalize it to become resourceful and knowledgable human beings. It can feel overwhelming to make our lessons accessible for all, however, start small by asking yourself the three questions above – seen, heard, translated. Try adding/changing ONE thing. Start small. We spend so much time planning GREAT lessons, we certainly want students to be able to access the learning!

I hope not to be away as long this time. I have so many deep thoughts floating in my brain after these past two years, with accessibility being at the forefront. Be well my friends, and reach out – after all, we are better together!


Take Care 💜

oFIShally Yours,

Erin Fisher 🐟🐟🐟

SEA my FAVORITES of 2019 👀 😍

2019

Hello friends!! Can you believe this is my last entry of 2019?!! Thanks for sticking with me and reading all of my fishy posts – 33 entries in the year of 2019! It has been a great year in education and there have been so many AWESOME experiences, tools, and lessons that have come up throughout the year. As I reflect on 2019, a professional highlight for me has been the work our district has done with UDL, Universal Design for Learning.  I’ve seen educators really transform from good to great when implementing these principles.  Technology can play a very important role in UDL – offering many opportunities to engage learners, represent content in different ways, and allow learners different opportunities to express their knowledge.  Sharing tech tools and practices that capitalize on UDL has been a passion of mine throughout 2019.  Anyone reading knows I LOVE to share; and although I share many great ideas, a few are certainly on the top of my list. Care to sea  👀 my top ten of 2019 (in no particular order)? Let’s take a look below!

My Favorite Organization ❤️️

In 2019, I became a board member of the MassCUE organization.  MassCUE stands for Massachusetts Computer Using Educators and is a chapter of the larger, national organization, CUE. To say that I simply love MassCUE and all that it stands for would be an understatement.  For years, I was a fangirl of MassCUE, it’s board members, and it’s events.  I remember attending the fall conference and running up to Rayna Freedman (now president), like Buddy the Elf, exclaiming “Hey I know you!” Now, I am a much larger part of the organization and help it to run.  MassCUE has so much to offer educators in the commonwealth. From free PD both online and in person, to Podcasts, Twitter chats, local meetups called CUE-ups, and the largest state-wide conference – MassCUE has something for everyone.  Consider joining today – I promise you will NOT regret it. Click here to learn more about MassCUE. 

My Favorite Conference 🧡

This past spring Medfield Public Schools held its annual DLD conference. However, this year, they changed the theme from “Digital Learning Day” to “Design Your Learning Day.”  Offering many choices centering around good teaching practices.  This conference has always been a highlight of the year for me since I started attending in 2017.  Neal Sonnenberg, an integration specialist in Medfield, has become a dear friend of mine and does so much work behind the scenes with an amazing team to organize a great day.  The keynote for DLD 2019 was a group of teachers or integrators who each gave a passion pitch. This “passion pitch” was an innovative idea that got away from bloated keynotes and really focused on the WHY of teaching. This idea caught on and other districts are now implementing it.  Medfield DLD gives a lot of choices in its offerings throughout the day as well. You can really personalize and maximize your day of learning. I can’t say enough about this conference!  Maybe you’d like to present? Click here to check out Medfield DLD.

My Favorite Google App 💛

I. LOVE. GOOGLE. Really, this one is a tough choice because all of the core Google Apps have so many hidden bells and whistles. Although, there is one Google App that went through a lot of change for 2019. This particular app is amazing for accessibility, offering choices for students, and encouraging collaboration between teachers.  My favorite app of 2019 is Google Classroom! The student selector on the IOS version of Classroom was a pretty nifty little add – but my favorite changes to this app this year has been the BETAs Google is testing out. Originality reports and rubrics are a great improvement to Classroom. I simply cannot say enough about this tool! If you’re not using Classroom to it’s fullest potential, or even if you think you are, check out my tutorial below. I bet you’ll learn something new! You can also check my previous blog post on Classroom here which contains many video tips!

My Favorite Ed-Tech Tool 💚

I have so many Ed-Tech tools that I like and that I try to encourage teachers to use such as KaHoot, Quizizz, Quizlet, Flippity, Flipgrid, Brush Ninja, Tall Tweets, SeeSaw, Epic, and EdPuzzle just to name a few. The tool I always come back to, however, and that I find to be a true game-changer, is Pear Deck. The Pear Deck platform offers every learner a voice.  There is so much choice built-in to this tool when designing a lesson. You can have the deck run whole group or student-paced; you can ask open-ended questions, have students draw an answer, or create a match type question; You can embed videos or websites into the deck.  You can even ask unplanned questions on the fly and hear from EVERY student, not just the singular hand raised. The sky is the limit with this tool. This year, as in all years, they continue to improve and change. Pear Deck paired (haha) up with NEWSELA this year to bring you premade decks that go along with articles. They also offered more lessons in the Orchard for you to try and an improved menu in the add-on for Slides! Pear Deck even joined forces with Microsoft and now works with PowerPoint as well as Google Slides. I believe in the power of this tool so much that I even have a whole category on my blog devoted to it. You can check that out here. Please reach out if you’d like to try this tool – I would LOVE to SHARE THE PEAR 🍐 help you get started!

My Favorite Ed-Tech Blogger 💙

There’s probably no surprise here. Anyone who knows me, knows I talk about one particular blogger and his great ideas quite frequently.  I follow and/or subscribe to many excellent ed-tech/education blogs: Practical Ed Tech by Richard Byrne, I Heart EDU by Meagan Kelly, Tech Tips 411 by Jennifer Hall, Ditch That Textbook by Matt Miller, The #EDUGif Guy Jake Miller,  and many more. Keeping up with all of the great ideas out there is a job within itself, but one particular Ed-Tech blogger makes it pretty easy. It’s none other than Eric Curts author of Control Alt Achieve. Not only does he have a great blog, but he also hosts a monthly live meeting that anyone can join. My schedule has only allowed me to join once, but I’ve watched the videos back of these meetings quite often.  Eric is the ultimate sharer; he creates really great activities using Google Apps and puts them out there (for free).  He also finds many great activities using Google Apps and puts them out there as well, highlighting other AWESOME teachers.  If you’re looking for a great Ed-Tech blog to follow – Eric’s is my top choice!

My Favorite Video Tool 💜

Video is a great option when looking at representation or action and expression – two principles of UDL.  Video is another way to reach all learners and can be very engaging.  Take a look at our students today – how often in their free time are they watching YouTube?  So, why not use video in the classroom! Let them view videos of content on platforms such as YouTube, Discovery, Edpuzzle, Khan, or let them create videos with platforms such as Flipgrid, Adobe Spark, or SeeSaw.  Video is powerful and I, myself, use it often as a teaching tool. I even respond to emails with instructions using video. I feel that it can reach more learners having the video to see and even pairing in the text with closed captioning to read.  My favorite video tool to use is Screencastify! I like this tool so very much because it’s an extension for Google Chrome, which means I do not have to login or go to a separate website to use.  The videos go right into my Google Drive and it’s so very quick to get them out to viewers.  This tool works seamlessly with YouTube, Wakelet, EdPuzzle, Flipgrid and many other video hosting platforms. Again, there is so much choice within Screencastify in terms of showing the webcam or not, using drawing tools to show a skill, recording internal audio, pausing the video in the middle, and so much more.  To learn more about this FABULOUS tool that is my favorite video tool of 2019, click here!

My Favorite Extension ❤️️

I have so many Google Chrome extensions, it’s really hard to pick a favorite.  You can find an extension for anything! A few extensions I use daily such as Grammarly, Bitmoji, and Emoji Keyboard for Chrome. I love extensions so much that I used to run into the problem where I had so many running that my browser slowed down.  Well, that’s where my FAVORITE extension comes in. Extensity is a great extension that allows you to turn on and off extensions with a simple click of the mouse. This keeps your Chrome Web Browser running at top speed, while also allowing you to use your favorite extensions when you need them. Check out how to use it below!

My Favorite Font 🧡

My favorite Google Font(s) of 2019 is the newly added Lexend font(s).  This year Google teamed up with Thomas Jockin typeface designer and founder of TypeThursday. Together they instituted the Lexend fonts in Google Docs which have been researched and are meant to improve reading speed.  You can read more about these cool fonts here! 

My Favorite Google Add-On 💛

Google add-ons, much like Chrome Extensions, extend the productivity of Google Applications.  You can do so much with add-ons.  Autocrat is one of my favorite add-ons for Sheets. I love how it creates a mail merge and allows you to automate emails with a click of a button. Although I do love Autocrat and the cool things it can do, by far my favorite Google Add-on is MAGIC RAINBOW UNICORN.  Simply because it’s fun! This add-on works for both Docs and Slides!

My Favorite Google Docs Trick 💚

This year Google Docs released a live word count tool that counts as you type! You have to manually turn this on, but what a great visual for students to have especially for those college essays! See the video below of how to use this great tool!

Wow! I could go on and on with more of my favorites, but a top ten seems just right for now! What are your favorites?

Stay tuned as I post in 2020 about GIFs, QR CODES and MORE!

Happy New Year Everyone! Take Care!

Bitmoji Image

oFISHally Yours,

Erin Fisher 🐟 🐟 🐟


The Lid on the Tuna Can 🥫🐟

You're the best Be a Champion for ALL of our kids You're the best
 

This week I had the amazing opportunity to teach 3 blocks of Intro To Computers.  It was my first time having High School students solely to myself in longer, 77-minute, blocks.  The VERY first thing I did was attempt to connect with students. I spent time with the students…saying hello, asking about their schedules and lives, simply talking to them. Each and EVERY one.  If you know me, you know I can be loud, boisterous, and sunshiney (to the point where I can annoy some people). I engaged with the students and invested that time early, to get them working – which they did! We are a community and these are all of our kids. I went into teaching because I LOVE kids – all of them. I have a soft spot in my heart for the students who are the most work.  The most difficult kids are those who need the sense of community the most. It’s not screen time,  it’s not parenting, its community and we need to provide that for many of our students who only find it here, at school. Taking the time to connect with the students first, and show that I do care, pays me dividends in the end in terms of students working towards my objective.

Recently I attended a workshop by Jimmy Casas author of Culturize. He challenged me to think differently, stop blaming external factors, and ask myself what can I be doing? What are my fears that cause me to blame?

What we model is what we get.

The investment of time means a lot to people. Are you accessible to people? Do you have an open-door policy – and DO they walk through your door? If someone walks by and you don’t say anything it’s a missed opportunity, a missed opportunity to connect or model the behavior we want others to have. Model the behaviors that you want to see repeated. If appropriate and positive interaction is what you desire, model this yourself with others in the room and the greater classroom community. We have a responsibility to build our culture. Lead Learning and build culture – this is our job. See yourself as a community builder – first thing, think: What am I doing to build a community? Everything we do is based on the connection we make with students, and as much as I love technology – this does not replace the connection we can make face-to-face. The investment of time isn’t happening in many classrooms across the country….are we modeling the poor behavior we see in our students? Subtle things we do impact our culture in negative ways. When we complain about a student – that negative behavior is the same behavior we see in him/her. Invest the time, face to face, first thing  – the time you take now will reduce the time you could spend later trying to get your objectives accomplished.

Tech Tools to Assist:

Your Why

Remember what you said when you were in that interview chair – what is your WHY? Come back to that. Why are you doing what you’re doing? Teaching is hard, but when you’re tired – go find the child. Don’t wait for someone to come around and change your attitude…go engage with people. Go sit with a student and engage. Fill your own cup up, don’t wait for others to come and fill it.

When you know your why your what has more impact because you are walking in or towards your purpose. – Michael Jr, Comedian

The Blame Game

Clarity proceeds confidence. When students do not follow instructions we need to resist blaming the students and say to ourselves “clarity proceeds confidence” and try to be more clear.  Show students what excellence looks like, then coach them through it. Stay in there with feedback until they get to the level you want them to be at. We’re delegating too quickly when students are not yet at the level we want them to be at. If we delegate the task too early, we exhaust ourselves with trying to get there. We look for external things to blame for behavior – and we spend more time on that than trying to understand the behavior itself. Ask yourself – I wonder what happened to the student that they act that way? I had a student this week who simply sat and let me know they were going to just sit, and not do anything. The child wasn’t disruptive.  A friend told me, “That student is working harder than anyone in the class. For that student, it is harder to simply come to school and just be present than it probably is for the student next to him/her doing the work.” I had to really ask myself, why?  I didn’t ask the student to engage and I didn’t kick the student out, I just went and sat with the student. I stated that I cared, that I was worried and that I hope the student is okay. I didn’t ask the student anything – I did not pry.  By the end of class, I received a smile from the student and he/she stated, “It’s not you.” If I continued in the class, I would’ve continued this routine with the student and am confident, eventually, I would get this student to engage in the work of the class. However, I would need to invest the time. Every student is worth that time.

Tech Tools to Assist:

In Closing

Don’t be the lid on the Tuna can…Don’t give ALL the reasons you can’t do something.  Don’t let the fear of failure hold you back. Ask yourself – DO YOU WANT TO BE GREAT?  The world WANTS to be average and tries to pull us back…Just accept that you can never be average.  Everybody wants to be a part of something great! 

Take care, everyone,

oFISHally yours,

Erin Fisher 🐟🐟🐟


What’s the PORPOISE of STEAM 🐬 🚂 🗃

Bitmoji ImageBitmoji ImageBitmoji Image

The Porpoise of STEAM

One of my favorite books is Steam Train, Dream Train by Sheri Duskey Rinker. She is also the same author of Goodnight Goodnight Construction Site, which like Goodnight Moon, I can recite by heart as it was a favorite at bedtime for many years. Naturally, when I hear the word STEAM, as in Science Technology Engineering Art/Action and Mathematics, my mind goes to Steam Train, Dream Train.  What a perfect acronym  – and what a wonderful picture in my mind.  Children, at an early age, are usually entranced by trains. Even now when the train goes by, and my children and I are stopped at the tracks, we turn down the radio, open the windows, and listen.  The train tracks also happen to run by the soccer fields in the town where I live. You can bet, that when that train comes by during Saturday Soccer, almost every child stops to watch!  This, of course, doesn’t bode well for the soccer game – and it gives our home teams quite the advantage during tournaments as they are accustomed to these loud trains coming by every hour or so. Like the STEAM train, STEAM concepts also entrance our students.  The art of DOING engages our students like no other practice.  Children enjoy trains because they’re loud, they have gears that come together to make something so large run and they like to figure out how and why it works. This same enjoyment applies to the classroom as well.

Image result for cone of learning

If we look at the Cone of Learning, it’s easy to see that by DOING we retain the most knowledge and information.  My children, in addition to watching and listening to the train, also had a train set and would build tracks for the train to ride on for hours! What can we do in class to get this same retention? What can we DO, what can we BUILD, what can we ENGINEER?  Well, it’s easier than you think and I’m here to help! Let’s look below:

Digital Breakouts 🔐

Breakouts are a great way to have kids up and DOING! Collaboratively, they work together to breakout, unlock, and/or escape a scenario.  Stacy Linnehan reached out after having much success with ELA breakouts and asked for assistance creating one for math! I had the fortunate opportunity to create and present a breakout for 6th grade. Let me tell you, every child was 100% engaged and it was amazing to watch.  The kids were using technology and mathematics, they were talking and listening to each other. They had to work together to “break the code.” This activity took the exact same math problems they were going to do on paper and packaged them into a different format.  Kids were high fiving when they solved problems and it was awesome to see.  If you want to try the breakout, give it a shot by clicking here and see if you can escape! The forms are anonymous and not collecting emails.

 Let’s Build with Post-its! 🗒

Thank you, Beth Barra and your AWESOME knowledge of using Instagram as a teaching resource (like Twitter).  She shared this really cool lesson, from Post-it, creating Pixel Art with Post-it notes and using it to determine area and perimeter.  Students are BUILDING, and how much fun, right?  If you’d like to see tips from Post-it for this lesson, click here. There are so many STEAM concepts in this lesson!

Let’s Color and Bring our Creations to LIFE! 🖍

Oh. My. Goodness! This is SO COOL!  I can’t really explain it well enough in words, so there’s a two-minute video below. Basically, you color a page provided by the website Quivervision (click here).  There are MANY different pages that contain both fun and educational concepts. Then, you put the app, either on a phone, tablet or Chromebook that supports the Google Play Store, and VOILA! Your creation comes to life and you can INTERACT with it!  My video below shows an animal cell, but the free pack also contains math concepts, maps of the world, an exploding volcano and holiday pages.  I LOVE that this app is available for my own kids’ kindles too! You can download the coloring pages from the Quiver Site, or you can click here and print.  The volcano Eruption is REALLY COOL!

Need More Ideas? 💡

Take a look below at some great resources that popped up in our monthly MassCUE Twitter chat which focused on STEAM, hosted by the most amazing, and a finalist for STEM teacher of the year, TORI CAMERON!

Young Readers 📕

This STEAM site (click here), for early readers, is AMAZING! It has many books that relate to STEAM concepts, each with an experiment and a read aloud on the page! SO CUTE!

What to Make? 🏗

This is a GREAT site below my Mandi Figlioli and has SO MANY AMAZING ideas! Seriously, she is amazing.

What are you Making?

STEAM UP THE CLASSROOM 🏭

Our very own, Tori Cameron, was a finalist for STEM teacher of the year in Massachusetts! She hosts a monthly podcast that focuses on STEAM concepts.  Visit her site here, and take a listen for so many great ideas!

Wakelet Chat 🗣

Lastly, if you need even more – or are just looking to expand your PLN, click here for our latest MassCUE Twitter Chat.  You can review all of the great ideas and questions that teachers had regarding STEAM.

🚂 🚂 🚂

So, what is the PORPOISE of STEAM? I believe it’s to ENGAGE and prepare today’s learner for our ever-changing world!  STEAM concepts are embedded into so much of what we do! Building, doing, engineering, acting – what will you try?  Let me know!

Take Care Everyone! 💙

oFISHally Yours,

Erin Fisher 🐟 🐟 🐟

Funfetti Fish

Bitmoji Image

Did you ever have Funfetti cake? I mean seriously…what is better than a Funfetti Cake with Funfetti frosting? This was my go-to in college, and I think I could eat a whole cake by myself! Funfetti cake is THAT good.  Tech Tidbits are kind of like Funfetti, little sweet sprinkles that make something already good, even better…and even more colorful! This week, I’m focusing on some tech tidbits – pieces of Funfetti to brighten your day!


Adobe Spark – on your PHONE!

I mentioned Adobe Spark and our EDU Enterprise account in a past post. This is such an awesome platform that I need to mention it again. It is FREE FOR SCHOOLS (premium version) and it allows you to do so much.  The app on my phone allowed me to easily drop in photos and videos. Then I could access it on my computer and manipulate the slides.  Take a look below at Sherri’s AWESOME math class that I was able to use footage from to create a Spark Video!

The Spark Webpage option is also AMAZING! Check it out here, this is an Adobe Spark Webpage explaining Adobe Spark! Reach out if you want to use this tool!

Google Updates – HUGE

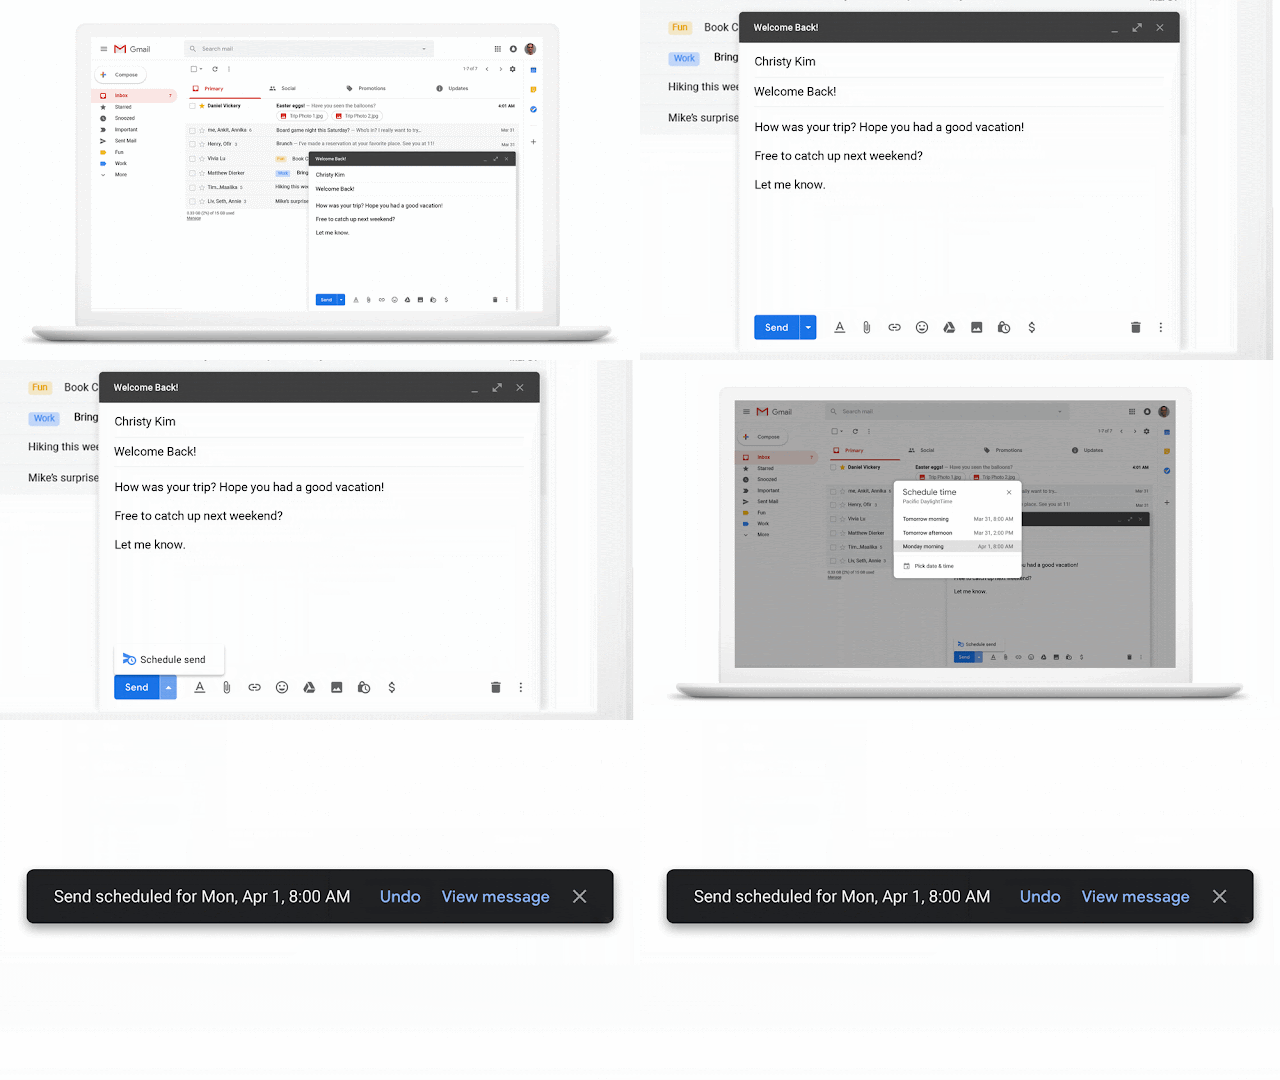
Talk about EXTRA sprinkles… There are two HUGE updates coming (among others) to our favorite Google Apps.  First, Gmail will have a “schedule send” feature AND Slides is FINALLY getting the ability to have sound files running throughout the presentation WITHOUT a workaround!!! These updates will roll out over the next two weeks so check for them and expect to see a video from me on how to use these awesome new updates!

Google Snake with Geography??!! 

Oh HELLO, YES!! Remember your very first Cell Phone Game, on your awesome Nokia with the cool custom cover and colorful buttons? I had a bright unicorn cover ( I know you’re shocked by this, right?). Well, Google just released Snake BUT with a geography focus. You can capture various landmarks all over the world! Just a little piece of Funfetti!

Get through your Wall!

This video is POWERFUL! Thank you Amy Schleinkofer for sharing! This is a good watch for both teachers and students.

Tip of the Week: Positive Sign Thursday

Have you heard of #PositiveSignThursday?  It’s a REAL thing created by another teacher, in another state, but it’s spreading across Massachusetts!  Check out the # on Twitter! A few of us have been doing it here! The idea is we all use the same sign. On Thursdays, we post the sign and pictures with our kids and each other! It adds a little sunshine and spreads a positive message. Check out my friend Marty, now principal in Norton and his news story about Positive Sign Thursday here.  See Megan McGovern’s posts (using Adobe Spark) below on Positive Sign Thursday here in EB!!! If you want to join us click here! Simply look at the date of the sign in the speaker notes, print, take a pic, and post with the #PositiveSignThursday!

What’s your “Funfetti”? Reach out!

Take Care Everyone!
oFISHally Yours,

Erin Fisher 🐟 🐟 🐟

CAST your (student) voice! 🎣 📣

Bitmoji Image

Cast Student Voice

What do we do about apathy? There are so many obstacles when it comes to teaching, so many hills and valleys, but what do we do about the student or adult who just does not care?

Don’t try and fix something you love – but look at what doesn’t work. We all have to try and close the gaps between our achievers and those who are not reaching learning targets.  If we want to believe every child can learn, we should not be proactively taking them out of the game and expecting them to do something else. We need to find ways for them to successfully access the curriculum. We need to give all of our students a voice. 

Do you have students apathetic to learning?  Engagement is key in decreasing student apathy. Offering students choice increases access to a goal and can also provide engagement.  As educators, we cannot assume that our preferences as teachers are their preferences as learners.  We may think a lecture is best, taking notes is best, showing a video is best, technology is best, but this may not be what works for every learner in front of us.  Data doesn’t lie, and if we have gaps in our data between those achieving and those who are not, then what we’re choosing may not be what is working.  

When students take ownership of their learning, they are more engaged and thus have greater success. As educators, we often decide the activity surrounding the lesson. We may even get excited about our plan, but some of our students may not.  Again, our preference may not be theirs and our activity may not be accessible to all learners despite what we may think.  Surveying and asking kids what they’re interested in can assist in learning what they prefer. Google Forms are an awesome tool for this and it gives us valuable data to say: “We’re doing this becauseI have data that shows…” If we want to steer the direction of the lesson, providing some choices for students and allowing them to choose a preference can also work.  What are some choices we can provide? How about some options that give our students a VOICE! Let’s take a look below:

Google Forms Bitmoji Image

Google Forms are a great tool for assessment, but they are also a great survey tool as well. They can really assist us as educators in learning our students’ preferences as learners.  This is a great post by Catlin Tucker on using Google Forms to get to know our students.  If we can gather information on our students’ likes and dislikes it can help us be more effective as educators. Catlin even provides a FREE Google Form you can use to get to know your students.

Podcasting sound on

OMG, have you tried Anchor?  WOW this podcasting app, and web tool, incredible!!! It is also FREE!  Thank you to Brandon Hall, tech integrator from Pembroke, for walking me through this awesome tool.  Podcasting has exploded on the scene with both students and adults listening to Podcasts and creating podcasts! There’s a podcast for everyone really. You can find a series on sports, education, mystery etc Many of your favorite TV personalities even have a podcast.  So, how does this apply to the classroom – let’s have kids MAKE a podcast and cast their voice! What an incredible way for a student to show learning, and the best part, you could listen to it on your drive home, or while correcting papers. Reach out if you would like to start Podcasting with your students! Check out this great Google Slidedeck here on how this can be used in the classroom and Brandon’s overview of Anchor below!

This is a great article on how to use Podcasts in education. Our own Tori Cameron has a popular podcast channel on all things STEAM that you can listen too as well, and she is the guru when it comes to podcasting!

Video Bitmoji Image

Student video is also a great way to allow students to cast their voice! It is also another great way students can showcase their learning. Flipgrid, SeeSaw, and Screencastify are all wonderful tools that allow students to create video easily to showcase knowledge.

You could use Wakelet to put all student video in one place! Wakelet now integrates with both Flipgrid and Screencastify and would provide a great curation example of student video!

As a teacher, you can also create video and flip your classroom.  Check out the video below from Bill Silva, East Bridgewater Biology Teacher, that he uses with students.

Translator App Bitmoji Image

Recently, Microsoft unveiled their new translator app. This app is incredible and is available across all platforms. I was playing with it the other day, thanks to my pal Colleen Terrill, and it has many more features than my previous fav – Google Translate.  This article here describes the features and functionality of the app.  If you are traveling to a country where you cannot speak the language, or have EL students you wish to communicate with, give this app a go and provide voice to your student!

Tech Tip of the Week: Google Voice Bitmoji Image

Did you know your Google Account can be associated with a phone number? You can then link that number to your actual number on your mobile phone.  You can also use Google Voice as an app and on the web.  This would be useful if you wanted to text students or parents, but didn’t want to give out your personal number and did not want to pay for an additional number or phone. Click here for an article from another Tech Blogger on his top reasons he uses Google Voice in the classroom!

How will you give your students a VOICE and let them be heard?

Take care!

oFISHally Yours,

Erin Fisher 🐟 🐟 🐟

The Sea of Digital Creation 🌊 📹 🐟

Bitmoji Image

The Sea of Digital Creation

Wow! It is the first five day work week of the new year and boy am I energized!! So much good stuff happening everywhere! This week I’d like to feature a few awesome teachers, and also a few awesome tools, that all center around digital creation.  When I see students creating, I see engagement! Students are working, sometimes together and sometimes alone, on a common objective. They may all be using the same tool, or have a choice of different tools, but they are problem-solving and synthesizing information to present a product that demonstrates mastery of a concept. When I’ve been in rooms where students are creating, I notice not a single student is off task.  Every student, even if talking, is concentrated on creating the product.  Now, this may be because the tool or the content is engaging. AS we know, the first step is engagment…that hook! Once we combine the tech tool, with engagement and content….BOOM! It’s where the magic happens and it’s amazing to see! Let’s take a look at these engaging tools, and teachers, below!


Tools 🛠️

Brush Ninja Bitmoji Image

This is an AMAZING tool for student and/or teacher creation! It was suggested to me by my good friend Colleen Terrill, Instructional Technology director of Mashpee after her students had such success with it! Take a look at the video below to see how to use Brush Ninja, an animated GIF creator. It is so much FUN to play with.  This is also a great article by Richard Byrne on ideas of how you can use this tool for presentations. Amy Schleinkofer, 5th grade teacher, used it this week and had students post their GIFs to a Padlet. Check out some of the amazing examples of the water cycle by clicking here…Ally’s is pretty AMAZING!

JamBoard Bitmoji Image

Google JamBoard is both an actual board and also a Google App located in the waffle, just like Docs or Slides.  It’s intended to be used on Google interactive boards (Jamboards), but can be used by any Google user.  This really cool app works best on a tablet, or the app version in the Google Play store, but also has a web-based version. Think Smart Notebook Software (kind of) but in the Drive! On the app version, you can Drive content, images, links, and also write on the blank canvas. As you write, the jam appears to anyone you share it with in live time.  Just think – you can walk around the classroom with a tablet and whatever your write appears on your mainboard and also student screens. Pretty cool right? The possibilities for this tool are endless! Take a look at the video below for a brief overview. Click here to try Google Jamboard!

Wakelet Bitmoji Image

As I learn more about this tool, I grow to love it even more.  Wakelet, as I mentioned last week is a curation tool.  You can add various types of content and keep it in one organized place, called a Wake.  Recently, Wakelet paired up with both Flipgrid and Screencastify to offer integrations with both of these great tools!  Take a look here at this article on Screencastify + Wakelet. Below, I included a brief video which mentions the Flipgrid integration.  Simply post the family link in your Wake, and BOOM your videos appear! You can then add additional content with your Flipgrid videos, like Slidedecks, links, text, and video!


Teachers 🍎

Shout outs to some awesome teachers this week!! Check out the Choice Boards below created by Amy Ronayne, Jamie Hulke,  Stacy Linnehan and Beth Barra (in that order).  These boards provide engagement for students as they choose how they want to approach a concept. The end product allows for creativity and a bit of student personality as well. These teachers are always willing to share, be sure to reach out to them and/or follow them on Twitter! They will gladly send you a copy of the board to modify for your own needs!


Just to give you an idea of the power of Choice Boards and/or Learning Menus, take a look at this tweet from Stacy Linnehan regarding her choice board she tried. Check out how many views it received. WHOA!  This board was originally inspired by another teacher she saw on Twitter. Sharing is caring and together we are better!

Tip of the week: BIG Google Classroom Updates (again) 💡

So, if you haven’t already noticed Google Classroom had another huge update this week! It looks quite different and a few new features have been added like drag and drop in the classwork page and assigning form quizzes directly from Classroom. Take a look at the article from Google here.

Twitter Chat 🐦

Don’t forget, if you’re looking to discuss great things you’ve tried, or you’re looking for new ideas, join our Twitter Chat THIS TUESDAY! It is going to be an AMAZING chat that will leave you feeling excited! I will release the questions ahead, so look for them THIS weekend! Haven’t done a Twitter Chat before, but want too? Reach out and I will gladly walk you through it! They are super easy and SO MUCH FUN!

I hope you’re finding this time of year as ENGAGING as I am! If not, reach out and let me help you feel engaged!

Take care everyone and be well ♥️

Bitmoji Image

oFISHally Yours,

Erin Fisher 🐟 🐟 🐟

Surf’s Up…Express Yourself! 🏄 🐟

Express Yourself

I often think of my own children when I think about choice and expression.

What do I do when I want my kiddos to eat vegetables…do I just put them on the plate and say EAT THEM? Well, yes…sometimes I do – because sometimes there are MUST DOs. However, sometimes, I really want them to eat some good stuff – like before a soccer game. So how do I get them to eat more, and want to eat it?! I cut up as many vegetables and fruits as I can, I put it on a platter, and put it in the center of the table.  The same vegetables that I will have the argument over if just PUT them on the plate – magically get eaten.  How many Pinterest posts do you see of food being made to look all sorts of cute (engaging) so kids will eat it?! How many secret recipes do you make to “hide” the veggies? Have you done this? Prepare food in a different way, or different presentation so someone will eat it? Sometimes, I let my kids cook the food – and that same food that they turn their nose up  at (shrimp) now becomes appealing because they had a stake in it. They know the love and work that went into making the food, and it makes it that much more appealing.


Whether it’s at home with my children, or here at school, sometimes simply the way we package things can make all of the difference. Are we giving choices? Are we giving different ways to interact with what we teach? Are we giving different ways for students to express their learning? How are we engaging our learners so they want to learn? Mickey Mouse pancakes with pureed zucchini hidden inside. 😉

In our own lives, we have choices of how we express ourselves as both individuals and also as teachers. We can choose to dress and present ourselves a certain way, we can also teach and present material in the way we choose. Think about the excitement and empowerment you feel when you’ve curated just the right lesson.  YOU were able to choose that activity, lesson, idea etc So why not allow students the same choice?  How can we allow students to choose how they show knowledge best? Let’s EMPOWER and EXCITE our learners by providing them with a choice! Just like my children with their vegetables, choice can produce some magical outcomes!

The Brain 🧠 Bitmoji Image

Did you know that when we offer students multiples ways to express learning we’re actually activating a whole network of the brain?! Pretty incredible right?! By maximizing the different networks of the brain, we are increasing student learning and success!

So how can we give choice in expression? Bitmoji Image

There are so many options we can give to students in how they can express knowledge. They could take an assessment, write a paper, record a video, create a project etc. Whichever way they choose, the rubric to assess could still remain the same! Seeing what students choose is eye-opening, and gives us some insight into their learning styles!

Let’s take a look at some different options that you could use for students to EXPRESS knowledge:

Infographics (posters) Bitmoji Image

Infographics can be BEAUTIFUL ways for students to express knowledge – think Digital Poster.  They can include information, images, links, animations and plenty of other cool features!  PiktoChart and Canva are two great (free) tools to use to make Infographics.  The advantage to these tools, over say Google Draw (a personal fav), is that they have some canned content you can use.  Lots of speech bubbles, shapes, frames, backgrounds etc. As always, let me know if you need help with these tools!

PiktoChart

https://piktochart.com

Canva

https://www.canva.com/

Digital Books  Bitmoji Image

Digital Books are so much FUN! Think of a book on a computer with virtually turning pages!  A digital book can contain text, audio, video, images, and much, much more! Unfortunately, you only get one free book per digital book site, BUT, there are many digital book sites out there. Here are two of my favorites:

Book Creator

bookcreator.com

Flip Book

http://fliphtml5.com/

Creative Slide Presentations Bitmoji Image

If you’re looking for a cool Slide Presentation tool that goes a little beyond Google Slides (gasp!) check out Animaker or Powtoon. Both are free (although do have premium options) and allow students to make some pretty cool presentations! Check out a video example below of a current 6th grade project we’re working on!

Animaker

https://www.animaker.com/

PowToon

https://www.powtoon.com/

Putting it all together Bitmoji Image

So, next time you need to assess a standard, how about a Choice Board for student expression? For instance, students can write an essay, make a Digital Book, create a presentation, or make a poster (digital or drawn). I find giving choice, but not too many, can provide some parameters for those that can get overwhelmed. Switch out your choices with different assignments – offer a test as an option or a make a video! Not every student learns the same way, so why give everyone the same assessment? Provide the same rubric for everyone with the key points, and see the magic happen. Let me know if you give this a whirl, I’d love to see it in action!

Tech Tip of the Week: Download Docs (or Sheets, Slides, Draw) into other Formats  

Sometimes it’s the little things that we need…Take a look at this SHORT video clip here to see how you can take your Google Format and convert it into PDF, Microsoft, or other formats.

Don’t Forget that Holiday Tech! 

Click the link here for my Holiday Tech Google Doc! 

Once again, thank you for choosing this blog! I hope you are all having a FABULOUS week!

oFISHally Yours,

Erin Fisher 🐟 🐟 🐟

Choice of Fish 🐠 🐟 🐡 🍥 🎣

Hello everyone!

Thank you for making the choice to read my blog this week.  I’d really like to tap into the topic of student choice.  There are so many great ways, digitally, that we can offer students choices.  In the recent article, What Giving Students Choice Looks Like in the Classroom, the author goes on to highlight the small things we can do as educators to give students choice within their day.  As brain-based research shows, giving students choice and ownership over learning increases engagement, thus increasing student success. Believe it or not, student engagement leads to teacher happiness 😉 When students are engaged in learning you will feel so jazzed up that YOU created and/or facilitated that experience and the growth that students have. However, with the standards in place dictating what we have to teach, how can we give choice? Well, it can be done in such small tasks as allowing students to choose whom to work with or if to work alone. It can be the choice of where to work or sit, or it can be in greater tasks such as how they will learn the material and interact with the curriculum as well as how they will express their knowledge.  Let’s take a look below at some options for student choice in the classroom!

Choice Boards 

Why What How   

When I think of Choice Boards, my mind immediately goes to HyperDocs. They are alike but quite different as you can read in this great article! HyperDocs are similar to Choice Boards, however, Choice Boards may not include “hyperlinks.” In fact, Choice Boards can be COMPLETELY non-digital (gasp!!)! However, we can use digital tools to easily make choice boards. We can give students multiple ways to engage with content, work with content and express what they know with content! Google Docs, Slides, Draw and even Sheets lend themselves to creating Choice Boards which can then be easily pushed our via Classroom or simply displayed on the board. You could even print choice boards for students so they can check off choices they make. Take a look at the template below that I obtained from fellow Google Certified Trainer Tracy Mulligan.  You can have your own copy to manipulate and customize as well, click here! As always reach out for help, anytime!


Choice after the Mini-Lesson 

In Grade 1, DeAnna Munroe has been working on Choice Boards for her literacy lessons. Entire Slide-Decks dedicated to offering choice with the “what” or representation of the lesson are being created.  While the teacher facilitates and moves around the room, students are choosing how they want to practice the skill. DeAnna is seeing incredible growth and output when students are choosing what to work on and can also use their own self-interests to connect to learning!

DeAnna says:

We were working on the sound of al yesterday (heard in walk, talk, etc.) and after one student completed her first choice she visited the creation station and wrote a story with a bunch of al words in it on a large poster.  She attached little flaps to the story with hidden al words and the goal was for her to find the words hidden in the story.  The other day we were also working on plot and first, next and last.  In the creation station, a student wrote her own story about a Ninja Bunny and attached a plot organizer to a poster and filled in the events in the story.  We were working on the sounds of sh and th and a student made his own color by word project. My students are feeling very empowered with their learning!
                       

Choice within a Station-rotation Model 

Check out Sarah Beberman’s Math Choice board when students are in the Chromebook station. While Ms. Beberman has a small group, another group is choosing what to explore on their Chromebooks related to math content.  She creates this in a Google Doc and pushes it out via Google Classroom.

Choice Board for the Entirety of the Lesson 

Sherri Craven recently made her own choice board and it was incredible. The students came into class very energetic.  Sheri introduced her choice board and it was amazing how well it went.  The students were consistently on task, students were helping each other, and not once did they need to redirected back to Math. Sheri has always been an amazing teacher but with this choice board it could reach new heights.

Sherri says:

It was so awesome. All of the students were engaged! It was my first try but I was happy with what the kids were doing. I was able to check in with many more kids that I usually do!

Choice in Expression of Content (assessment) 

This is an amazing Reading Response Choice Board created by Plymouth Tech Integration Specialist, Joli Boucher.  You can view the Google Doc here and “File>make a copy” for your own needs! This board gives students choice in the way they will be assessed on the skill. Notice, they need to choose three!

My Own 

I firmly believe in giving students choices and since I am such a strong believer I created my own choice board for my children.  Digital Literacy is important to me, as both a parent and tech integration facilitator and I do not feel as though my boys are getting these skills at their own school. Therefore, Santa will be giving them Chromebooks and I will be bookmarking the choice board below (still a work in progress) to my sons’ bookmark bars.


Tip of the week (unrelated to the theme):

Instead of “do you have any questions?” state… “What questions do you have?”

In closing, I hope you feel as though you have many choices in your own learning. Explore text, video, blogs, Twitter, colleagues, friends – we have so many options even for our own learning.
Image result for student choice

Take care this week and stay tuned….Winter Holiday Tech is coming soon….. 🎄 🕎

oFISHally Yours,

Erin Fisher  🐟 🐟 🐟